
Your rig’s struggling. You know that feeling when you’re about to clutch a 1v3, and suddenly your frames tank from 144 to 45? Yeah, that’s not your aim letting you down. It’s your system crying for help.
Here’s the thing: most FPS guides tell you to “lower your settings” or “buy a new GPU.” That’s like telling someone with a broken car to just buy a Ferrari.
This guide covers the actual optimizations that boost FPS; from Windows kernel tweaks to GPU shader caches, the stuff that actually moves the needle.
60→240
FPS BoostTurn your slideshow into butter-smooth gameplay
Driver Deep Clean
DDU your GPU drivers and perform a clean install.
Windows Debloat
Kill unnecessary services and processes hogging resources.
GPU Unleash
Remove power limits and unleash your GPU’s true potential.
Clean Driver Install with DDU
Let’s start with the single most effective fix that nobody talks about properly. Your GPU drivers are probably a mess.
Years of updates stacked on top of each other, registry entries from that AMD card you had three years ago, corrupted shader caches. Time to nuke it all.
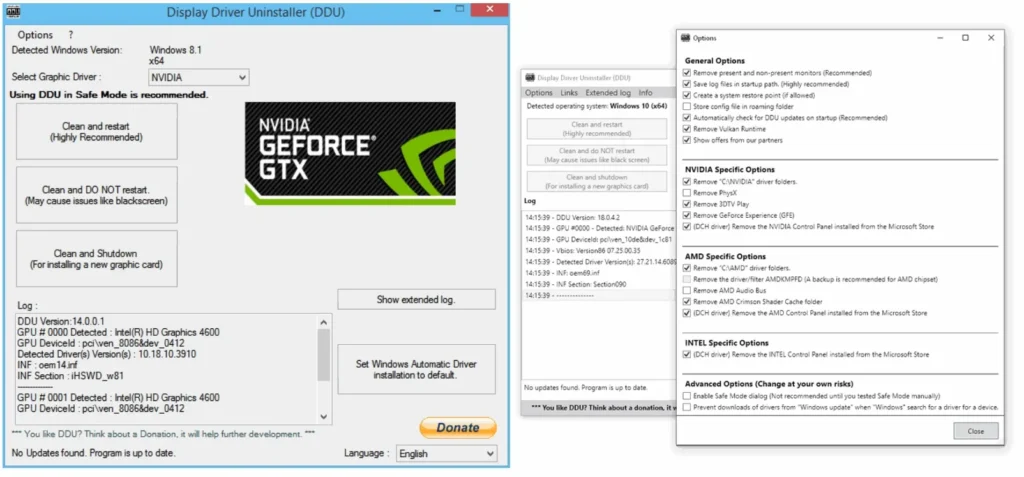
Download Display Driver Uninstaller (DDU)
Grab DDU from Guru3D. This isn’t your average uninstaller; it completely obliterates every trace of GPU drivers from your system, including registry entries that normal uninstallers miss.
Boot into Safe Mode
Hold Shift while clicking Restart. Navigate to Troubleshoot > Advanced Options > Startup Settings > Restart. Press 4 for Safe Mode. This prevents Windows from interfering with the cleanup.
Run DDU and Select “Clean and Restart”
Select your GPU vendor (NVIDIA/AMD/Intel) and click “Clean and restart”. DDU will remove everything including drivers, control panels, services, scheduled tasks, the works.
Install Fresh Drivers
Download the latest drivers directly from NVIDIA/AMD/Intel. During installation, always choose “Custom” and check “Perform clean installation”. This prevents old settings from carrying over.
Windows FPS Optimization

Windows is designed for grandma checking email, not competitive gaming. It’s running hundreds of processes you’ll never use, all stealing precious CPU cycles and RAM from your games.
Power Plan
Forget “High Performance;” there’s a hidden Ultimate Performance power plan that Microsoft doesn’t enable by default. Here’s how to unlock it:
This power plan keeps your CPU at maximum frequency, helps eliminate micro-stutters from power state transitions, and can slightly improve 1% FPS lows.
Disable These Services
Every guide tells you to disable Windows Search. That’s kindergarten stuff. Here are the services that actually impact gaming performance:
Services to Disable for Gaming
| Service Name | What It Does | FPS Impact | Safe to Disable? |
|---|---|---|---|
| SysMain (Superfetch) | Pre-loads programs into RAM |
High (causes stutters)
|
Yes |
| Windows Search | Indexes files for searching |
Medium (CPU spikes)
|
Yes |
| Connected User Experiences | Telemetry collection |
Low (network usage)
|
Yes |
| Print Spooler | Manages print jobs |
Low (RAM usage)
|
Yes (if no printer) |
| Windows Update | Auto-updates Windows |
Very High (during updates)
|
Set to Manual |
| Microsoft Compatibility Telemetry | Usage data collection |
Medium (CPU/Disk)
|
Yes |
To disable: Press Win+R, type services.msc, find each service, right-click, Properties, set Startup type to “Disabled”.
GPU Control Panel Tweaks for Getting Better FPS on PC

Most guides copy-paste the same NVIDIA Control Panel settings from 2015. Half of them don’t even exist anymore. Here’s what actually impacts performance, even in games like Valorant and Minecraft:
NVIDIA Settings
Shader Cache Size – Set to 10GB
Default is “Driver Default” which is only 256MB. Increasing this to 10GB eliminates shader compilation stutters in games. Located under “Manage 3D Settings”.
Nvidia Reflex or AMD Anti-Lag On in-game, if supported.
This can reduce input lag by up to 40%. Essential for competitive games.
Texture Filtering – Negative LOD Bias – Allow
Sharpens textures at a distance with zero performance cost. Most people don’t know this setting exists, however, it might not work for modern DX12/Vulkan games.
Threaded Optimization – On
Allows the driver to use multiple CPU cores. Can improve performance in older games by 10-15% in CPU-limited scenarios.
AMD Settings
Surface Format Optimization – Enabled
Allows the driver to use more efficient texture formats. Can improve performance by 5-10% with zero visual quality loss.
Shader Cache – AMD Optimized
Similar to NVIDIA’s setting. Stores compiled shaders to eliminate compilation stutters.
Anti-Lag+ – Enabled (Where Supported)
Reduces input lag by synchronizing CPU and GPU workloads. Can reduce latency by up to 30% in supported games.
Process Lasso and CPU Affinity
Here’s something barely anyone talks about: modern CPUs have efficiency cores (E-cores) and performance cores (P-cores). Windows is terrible at scheduling games properly, often putting them on slow E-cores.
Process Lasso can automatically assign games to P-cores only, set their priority to High, and maintain these settings permanently. This single tweak can transform stuttery gameplay on modern Intel CPUs.
Memory Optimization for Higher FPS
Windows has a dirty secret called the Standby List. It’s supposed to cache frequently used data, but in games, it causes massive stutters when it fills up.
Here’s how to tame it:
RAM Performance Impact
Solution: Use Intelligent Standby List Cleaner (ISLC). Set it to purge when free memory drops below 1024MB and standby list exceeds 1024MB. Also enable “Start ISLC minimized and auto-Start monitoring”.
This eliminates the random stutters that happen every few minutes in games, especially noticeable in open-world titles that stream lots of assets.
Network Optimization for Online Games
Lag isn’t always about FPS. Network optimization can eliminate stutters in online games:
These commands disable network offloading features that can cause packet processing delays in games. The improvement is especially noticeable in games with lots of players or high tick rates.
Optimizine Using Hone
If manually tweaking dozens of settings sounds overwhelming, Hone automates most of these optimizations. It’s basically having a PC optimization expert built into software. Hone handles driver optimizations, Windows debloating, network tweaks, and game-specific optimizations automatically.
What makes Hone different is it doesn’t just apply generic tweaks; it analyzes your specific hardware and applies optimizations tailored to your system. It can boost FPS by 20-40% with a few clicks, especially on systems that have never been properly optimized.
Windows Reinstall (Nuclear Option #2)

Sometimes, your Windows installation is too far gone. Years of registry bloat, driver conflicts, and leftover software make a clean install the only solution.
But don’t just reinstall Windows normally; here’s how to do it for maximum gaming performance:
Use Windows 11 LTSC or Debloated ISO
LTSC (Long-Term Servicing Channel) is Windows without the bloat, no Cortana, no Store apps, no telemetry. Alternatively, use tools like NTLite to create a custom ISO with unnecessary components removed.
Install with Internet Disconnected
This prevents Windows from downloading bloatware and generic drivers during installation. Install your specific drivers manually afterward.
Run Post-Install Scripts
Use scripts like ChrisTitusTech’s Windows Utility to remove telemetry, disable unnecessary services, and optimize for gaming in one shot.
Monitoring Your ‘Better’ FPS on PC
After applying these optimizations, you need to verify they’re working. Here’s what to monitor:
Key Metrics to Track
Use CapFrameX or MSI Afterburner to log these metrics. Focus on 1% lows; they matter more than average FPS for perceived smoothness.
The Bottom Line
Getting better FPS isn’t about one magic setting. It’s death by a thousand cuts in reverse, each optimization adds up. Start with the high-impact stuff (DDU, Windows debloat, GPU settings), then work your way down the list.
Most importantly, don’t just chase average FPS. A stable 144 FPS with good frame times beats a stuttery 200 FPS every time. Focus on consistency, eliminate the stutters, and watch your gameplay transform.
Remember: your hardware is probably more capable than you think. It’s just being held back by software that assumes you’re using your PC to browse Facebook, not dominate lobbies.
FAQs
Will these optimizations void my warranty or damage my hardware?
No, these software optimizations won’t void warranties or damage hardware. We’re not overclocking or modifying voltage settings. Everything here is reversible software configuration. The only “risk” is you might need to re-enable some Windows features if specific software requires them.
Which optimization gives the biggest FPS boost?
Clean driver installation with DDU typically provides the largest single boost (20-40%). Second is proper Windows power settings and disabling unnecessary services (15-25%). GPU control panel optimizations come third (10-20%). However, the cumulative effect of all optimizations often doubles or triples individual gains.
Do I need to do all these optimizations?
Start with the high-impact ones: DDU driver reinstall, Ultimate Performance power plan, and disabling SysMain/Superfetch. These three alone can boost FPS by a decent amount. Add more optimizations based on your specific bottlenecks. Use monitoring tools to identify what’s limiting your system.
Will these optimizations work on laptops?
Yes, but laptop users should skip the Ultimate Performance power plan when on battery. Also, ensure your laptop is plugged in and set to “High Performance” when gaming. Laptop GPUs often throttle on battery power. The other optimizations work identically on laptops.
How often should I redo these optimizations?
Major Windows updates (twice yearly) often reset settings and re-enable services. Check your optimizations after these updates. For drivers, clean install with DDU every 6 months or when experiencing issues. Process Lasso and ISLC settings are permanent once configured.
Can these optimizations fix stuttering even if my FPS is already high?
Absolutely. Stuttering with high FPS usually indicates frame time inconsistencies, often caused by standby list issues, timer resolution, or CPU scheduling problems. ISLC, timer resolution fixes, and Process Lasso CPU affinity specifically target these frame pacing issues.
Is Hone safe to use?
Yes, Hone is legitimate optimization software used by many professional gamers and streamers. It applies the same tweaks covered in this guide but automates the process. It creates system restore points before making changes and all optimizations can be reverted. Always download from the official Hone website.
What if my FPS got worse after these optimizations?
This is rare but can happen with incorrect Process Lasso CPU affinity on non-standard CPUs, or if you disabled a service your specific hardware needs. Start by resetting GPU control panel settings to default, re-enable services one by one, and ensure you selected the correct CPU cores in Process Lasso. When in doubt, system restore to your pre-optimization state.