Your aim’s on point, your comms are crisp, and then Valorant lags. A peek turns into a stutter, and boom; round’s over. We’ve lost count of how many clutches we’ve watched evaporate because of input delay, ping spikes, or mystery frame drops.
If you’re sick of blaming your net instead of your reflexes, this is your fix list. We’ll walk you through exactly how to fix lag in Valorant; from frame-rate tweaks to routing-level wins, so your only focus is hitting that one-tap.
- Lower your ping by connecting via ethernet, closing bandwidth-heavy apps, and optimizing router placement
- Fix FPS drops by updating drivers, using performance power plans, and closing background processes
- Reduce input lag with NVIDIA Reflex / AMD Anti-Lag and fullscreen mode
- Eliminate packet loss by troubleshooting network hardware and adjusting QoS settings
- Optimize Windows with Game Mode and High Performance power plans
- Adjust in-game settings by lowering graphics options and disabling unnecessary visual effects
- Fix server-related issues by selecting proper server regions and scheduling play during off-peak hours
How Different Types of Valorant Lags Work
“Lag” in Valorant comes in several different forms, and each type requires a specific approach to fix. Let’s diagnose your exact problem before jumping into solutions.
Network lag is the delay between your actions and the server registering them. It’s measured in milliseconds as “ping.”
- Rubber-banding (you move then snap back)
- Delayed damage registration
- Shots not landing despite good aim
- Players teleporting around the map
- Network problem icons appearing
- Ping readout showing high numbers (80ms+)
This occurs when your frame rate suddenly drops, causing the game to stutter or freeze momentarily.
- Game freezes for split seconds
- Choppy movement and animations
- FPS counter shows sudden drops
- Stuttering during gunfights or ability usage
- Consistent drops when certain events happen
- Game feels “choppy” rather than smooth
The delay between pressing a button and seeing the action happen on screen, even with good FPS.
- Movement feels “floaty” or unresponsive
- Aiming feels disconnected or delayed
- Noticeable delay between clicks and shots
- Game responds sluggishly despite good FPS
- Mouse movement doesn’t feel precise
- Character actions seem delayed even with low ping
Occurs when data packets between your PC and the server are lost, causing inconsistent gameplay.
- Network problem icons flashing
- Hit registration feels completely random
- Players/abilities skipping animation frames
- Sudden unexplainable deaths
- Weapons not firing despite clicking
- Disconnections or “reconnecting” messages
Fixing Network Lag & High Ping in Valorant
Network lag creates that frustrating delay between your actions and the server registering them. Here’s how to minimize it and get those milliseconds back.
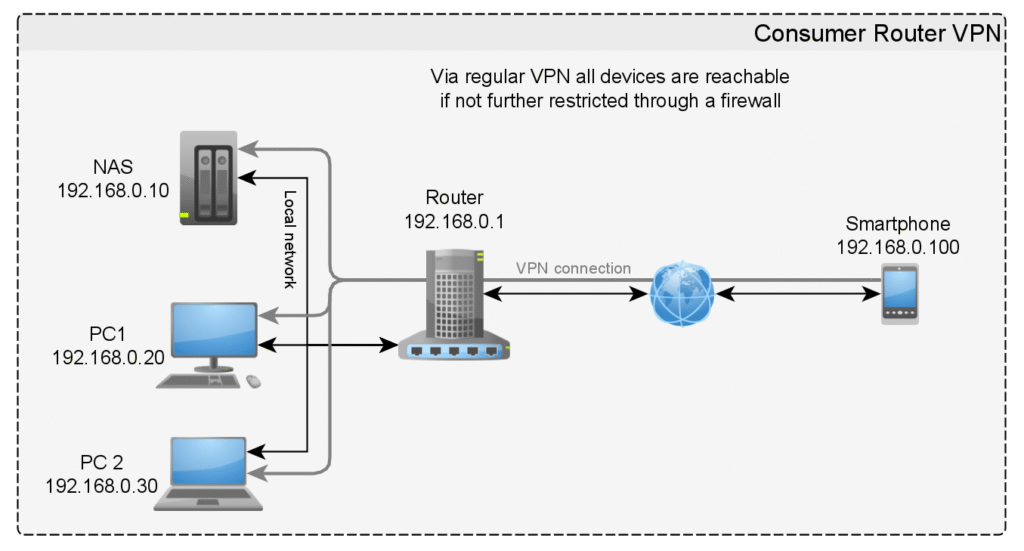
Your physical connection is the foundation of good ping. Wired beats wireless every time for competitive gaming.
- Use a wired ethernet connection instead of Wi-Fi whenever possible (can reduce ping by 5-15ms)
- Position your router centrally in your home if you must use Wi-Fi
- Reduce the number of devices connected to your network while gaming
- Close bandwidth-heavy applications like torrenting clients, Netflix, or other game launchers
- Use a gaming router with QoS features to prioritize Valorant traffic
Playing on the right server can be the difference between 20ms and 200ms ping.
- Play on your closest server region to minimize physical distance (key factor in ping)
- Check your account region in Riot Games settings to ensure you’re on the right shard
- Use a ping checker tool before playing to identify the best server
- Consider time of day – try playing during off-peak hours when servers are less congested
- If you must play cross-region (with friends), have the player with the best connection host
These tweaks can help prioritize your Valorant traffic and minimize interference.
- Update router firmware to ensure you have the latest optimizations
- Set up QoS (Quality of Service) in your router to prioritize Valorant traffic
- Disable IPv6 in your network adapter settings if your ISP doesn’t fully support it
- Consider a gaming VPN if your ISP is routing poorly (can sometimes improve routing)
Pro Tip: The Port Forwarding Trick
Port forwarding can sometimes give you a more direct connection to Valorant servers. Forward these UDP ports in your router settings for potentially improved stability:
- 7000-7999: Game client
- 8000-8999: Voice chat
- 64000-64100: Voice chat teams
This is especially helpful if you’re experiencing NAT issues or play behind a restrictive network.
Fixing FPS Drops & Stuttering
FPS drops and stuttering can ruin your gameplay, especially during crucial moments like gunfights. Here’s how to identify and fix the causes of performance dips in Valorant.
Outdated drivers are a common cause of performance issues. GPU manufacturers regularly release optimizations for popular games like Valorant.
- NVIDIA users: Download the latest Game Ready drivers from NVIDIA’s website or GeForce Experience
- AMD users: Get the latest drivers from AMD’s support page or Radeon Software
- Intel Arc users: Update through Intel’s download center
- After installing new drivers, do a clean restart of your PC before launching Valorant
Lower graphics settings can dramatically improve FPS stability. Here are the settings that impact performance the most:
| Setting | Recommended | Impact on Performance |
|---|---|---|
| Material Quality | Low | High – reduces texture complexity |
| Texture Quality | Low | Medium – affects VRAM usage |
| Detail Quality | Low | Very High – major FPS impact |
| Anisotropic Filtering | 1x | Low – minor performance cost |
| Anti-Aliasing | None | Medium – MSAA can hit performance |
| Improve Clarity | Off | Medium – post-processing effect with cost |
| Bloom | Off | Low – light effects with some cost |
| Distortion | Off | Low – visual effect during abilities |
| Multithreaded Rendering | On | High Positive – improves CPU utilization |
Background applications can steal resources from Valorant, causing stutters and frame drops during critical moments:
- Close browser tabs and applications before launching Valorant
- Disable startup programs through Task Manager > Startup tab
- End unnecessary background processes in Task Manager
- Pause/disable antivirus scans while gaming (or add Valorant to exclusions)
- Disable Game Bar and Game DVR in Windows settings (only on Intel and Single CCD Ryzen CPUs)
- Close overlay programs like Discord, Steam, NVIDIA GeForce Experience
- Press Ctrl+Shift+Esc to open Task Manager
- Find VALORANT under “Processes” tab
- Right-click > “Go to details”
- Right-click VALORANT.exe > “Set priority” > “High”
Windows settings can significantly impact your gaming performance:
- Enable Game Mode in Windows Settings > Gaming > Game Mode
- Set Power Plan to Performance/Ultimate Performance in Control Panel > Power Options (or try our own custom power plan)
- Try running the game as Administrator as it sometimes might help with specific issues.
- Disable visual effects in System Properties > Advanced > Performance > Visual Effects > “Adjust for best performance”
Overheating can cause severe FPS drops as your CPU/GPU throttle to protect themselves:
- Monitor temperatures with tools like HWMonitor, MSI Afterburner, or CoreTemp
- CPU should stay under 80°C and GPU under 85°C during gaming
- Clean dust from your PC using compressed air (especially fans and heatsinks)
- Improve airflow by managing cables and ensuring proper case ventilation
- Apply fresh thermal paste if your CPU is running consistently hot
- Consider additional cooling like extra case fans or improved CPU cooler
- Stutters during gunfights
- Frame drops when using abilities
- Inconsistent frame timing
- Micro-freezes during intense moments
- Performance degradation over time
- Smooth gameplay during firefights
- Consistent performance with abilities
- Even frame pacing for fluid motion
- No freezes or stutters during action
- Sustained performance in long sessions
Reducing Input Lag for Faster Response
Input lag creates that disconnected feeling between your actions and what happens on screen. Even with good FPS and ping, input lag can make your game feel sluggish and unresponsive. Here’s how to minimize it.
These in-game settings directly impact input lag and responsiveness:
- Use Fullscreen mode (not borderless or windowed) for lowest input lag
- Enable NVIDIA Reflex or AMD Anti-Lag depending on whether you have an NVIDIA or AMD GPU
- Set Limit FPS to OFF if you don’t mind screen tearing as it might help with seeing enemies earlier compared to capped FPS.
- Disable VSync as it adds significant input lag if used by itself. Only use V-Sync when paired with G-Sync and Reflex / AMD Anti-Lag “On”.
- Use a 1000Hz polling rate on your mouse (or higher if supported)
Your display can introduce significant input lag regardless of your PC performance:
- Enable your monitor’s gaming/low latency mode (different names per manufacturer)
- Use higher refresh rates (144Hz+ dramatically reduces input lag)
- Turn off any post-processing features on your monitor (Auto HDR, motion smoothing)
- If using G-Sync/FreeSync, pair it with V-Sync and Reflex / AMD Anti-Lag “On” for the lowest possible latency and no screen tearing.
- Try Fast Sync/Enhanced Sync instead of V-Sync if screen tearing is an issue
- Disable HDR in Windows as it can add processing delay
System-level tweaks can further reduce input lag:
- Set mouse speed to 6/11 in Windows settings (no acceleration)
- Disable “Enhance pointer precision” (mouse acceleration) in Windows
- Update to latest GPU drivers with optimizations for reduced latency
- In AMD Radeon Settings, enable “Anti-Lag” for Valorant
- Disable Xbox Game DVR and Game Bar background recording
NVIDIA Reflex & AMD Anti-Lag are game-changing technologies for reducing input lag in competitive games like Valorant. Here’s why they work:
- How they works: Reflex / AMD Anti-Lag optimize the render queue between your CPU and GPU, reducing the time it takes for your actions to appear on screen
- Reflex “On” mode: Reduces input lag by keeping render queues as small as possible
- “Reflex On + Boost” mode: Additionally keeps your GPU running at higher clock speeds even during CPU-bound scenarios, further reducing latency, but might lower FPS.
- Effectiveness: Can reduce input lag by 20-50%, depending on your system configuration
- System impact: Minimal performance cost, actually improves responsiveness
If you have an NVIDIA GPU, Reflex “On” or AMD Anti-Lag “On” should be your default setting for Valorant.
Fixing Packet Loss in Valorant
Packet loss is one of the most frustrating types of lag because it creates unpredictable gameplay. You might hit your shots perfectly on your screen, but the data never reaches the server. Here’s how to diagnose and fix packet loss issues.
First, confirm that packet loss is your actual issue:
- Enable network stats display in Valorant (Settings > Stats > Network round trip time AND Packet Loss)
- Look for the packet loss icon (three squares with an exclamation mark) during gameplay
- Track packet loss percentage (anything above 1-2% is problematic)
- Run a packet loss test with tools like WinMTR or PingPlotter targeted at Valorant servers
To run a basic packet loss test in Windows:
- Open Command Prompt as administrator
- Run:
ping -n 100 riot.com(100 continuous pings) - Check the final results for “packets lost” percentage
Most packet loss occurs on your local network:
- Use a wired ethernet connection instead of Wi-Fi whenever possible
- Check and replace ethernet cables (damaged cables can cause intermittent packet loss)
- Update router firmware to the latest version
- Reset your router (unplug for 30 seconds, then restart)
- Try different ethernet ports on your router (some might be damaged)
- Reduce network congestion by stopping downloads and streams on other devices
If basic solutions don’t work, try these more advanced approaches:
- Contact your ISP if packet loss occurs outside your network (they might need to fix routing issues)
- Try a gaming VPN like ExitLag, WTFast, or Haste to route your traffic more efficiently
- Enable Fast Path for DSL connections by following this link
- Use QoS (Quality of Service) settings on your router to prioritize Valorant traffic
- Check for network adapter issues by updating drivers or replacing the hardware if necessary
- Consider fiber internet if available, as it typically has more stable performance than cable
For QoS, you’ll need to prioritize these ports:
- UDP: 7000-7999 (Valorant game traffic)
- UDP: 8000-8999 (Valorant voice traffic)
- TCP: 5223 (Riot client)
Some in-game settings can help mitigate the effects of packet loss when it’s unavoidable:
- Set Network Buffering to “Minimum” if your connection is generally stable but has occasional packet loss (found in Settings > General)
- Try “Normal” Network Buffering if you experience severe packet loss (this adds some input lag but can smooth out connection issues)
- Consider lowering your Client Send Rate if your upload bandwidth is limited
- Limit other applications using your network while playing (especially uploads)
- Close Valorant voice chat and use Discord for comms if voice packets are causing issues
Sometimes, packet loss issues are completely outside your control and require ISP intervention. Contact your internet service provider if:
- Packet loss occurs consistently at specific times of day (indicating network congestion)
- Testing shows packet loss happens between your router and ISP (use WinMTR or PingPlotter to trace the route)
- Multiple devices on your network experience the same issues (ruling out PC/device problems)
- You’ve tried all local fixes with no improvement
- Packet loss occurs only with certain online activities (might indicate traffic shaping/throttling)
When calling, be prepared with evidence: screenshots of ping tests, traceroutes, and exact times when issues occur. Request a line quality test and ask if there are known issues in your area.
System Optimization for Maximum Performance
Beyond game-specific settings, optimizing your entire system for gaming can have a dramatic impact on Valorant’s performance and responsiveness. These are our most effective system-level tweaks to eliminate lag.
Windows power plans can significantly impact gaming performance by controlling how much power your CPU and other components can use.
- Search for “power plan” in the Windows search bar
- Open “Power & sleep settings” > “Additional power settings”
- Select “High performance” plan
- Click “Change plan settings” > “Change advanced power settings”
- Set “Processor power management” > “Minimum processor state” to 100%
- Set “Maximum processor state” to 100%
- Set “PCI Express” > “Link State Power Management” to “Off”
For advanced users, you can also unlock the hidden “Ultimate Performance” power plan:
Open Command Prompt as administrator and run:powercfg -duplicatescheme e9a42b02-d5df-448d-aa00-03f14749eb61
Several Windows services can be safely disabled or set to manual start for better gaming performance:
| Service Name | Recommendation | Impact |
|---|---|---|
| Windows Search | Manual | Reduces background indexing CPU usage |
| Sysmain (SuperFetch) | Disabled | Prevents RAM caching that can cause stutters |
| Windows Update | Manual | Prevents updates during gameplay |
| Print Spooler | Disabled (if not printing) | Small memory/resource savings |
| Xbox Game Bar | Disabled | Removes overlay and background recording |
To disable services:
- Press Win+R, type “services.msc” and hit Enter
- Find the service, right-click, and select “Properties”
- Set “Startup type” to “Manual” or “Disabled” as recommended
- Click “Stop” if the service is currently running
- Click “Apply” and “OK”
Many users don’t realize their RAM is running at default speeds instead of its rated speed. Enabling XMP/DOCP in BIOS can give you a significant performance boost, especially for CPU-bound games like Valorant.
- Restart your PC and enter BIOS (usually by pressing F2, F10, F12, or Delete during startup)
- Look for XMP/DOCP settings (location varies by motherboard, usually under “OC”, “Advanced”, or “Memory” sections)
- Enable XMP/DOCP Profile 1 (or select your RAM’s rated speed)
- Save changes and exit BIOS
- Your system will restart with proper memory speeds
This simple change can improve FPS by 5-15% and reduce frame time spikes, especially in CPU-limited scenarios.
Installing Valorant on an SSD significantly reduces load times and can eliminate texture streaming stutters:
- Move Valorant to an SSD if it’s currently on an HDD
- Ensure your SSD has at least 20% free space for optimal performance
- Enable TRIM for your SSD (Windows typically enables this automatically)
- Disable disk defragmentation for SSDs (Windows 10/11 should handle this correctly)
- Use NTFS file system rather than exFAT or FAT32 for best performance
To check if TRIM is enabled, open Command Prompt as administrator and run:
fsutil behavior query DisableDeleteNotify
If the result is “0”, TRIM is enabled (good). If it’s “1”, you can enable it with:
fsutil behavior set DisableDeleteNotify 0
Thermal throttling is a common cause of performance drops during extended gaming sessions:
- Monitor temperatures using tools like HWiNFO, MSI Afterburner, or CoreTemp
- Clean dust regularly from all fan intakes, exhausts, and heatsinks
- Improve case airflow by managing cables and ensuring proper fan configuration (positive or neutral pressure)
- Replace thermal paste on CPU and GPU if they’re running hot (every 2-3 years)
- Consider aftermarket cooling if temperatures consistently exceed 80°C for CPU or 85°C for GPU
- Create custom fan curves in BIOS (CPU) or software (GPU) for better cooling during gaming
For laptop users:
- Use a laptop cooling pad with fans
- Ensure bottom vents aren’t blocked
- Consider undervolting CPU (if supported) using tools like ThrottleStop or Intel XTU
- Clean internal fans and replace thermal paste if comfortable doing so
Programs that start with Windows can consume resources and cause background interference:
- Press Ctrl+Shift+Esc to open Task Manager
- Go to the “Startup” tab
- Disable all non-essential programs (leave antivirus and critical hardware utilities)
- Particularly focus on:
- Cloud storage syncing (Dropbox, Google Drive, OneDrive)
- Update checkers for various applications
- Messaging applications (Discord, Slack, etc.)
- Media applications (Spotify, iTunes, etc.)
- Restart your computer to apply changes
Sometimes accumulated errors or corrupted files can cause performance issues. A clean install often solves mysterious lag problems:
For Valorant:
- Uninstall Valorant and Riot Vanguard through Control Panel
- Delete remaining folders:
- C:Riot GamesVALORANT
- C:Program FilesRiot Vanguard
- Clear temporary files:
- Press Win+R, type “%temp%” and delete all files/folders
- Navigate to C:Users[YourUsername]AppDataLocalRiot Games and delete content
- Reboot your PC
- Download a fresh copy of the installer from the official Valorant website
- Install to an SSD if possible
For GPU Drivers:
- Download Display Driver Uninstaller (DDU) from Guru3D
- Boot into Safe Mode (Win+I > Update & Security > Recovery > Advanced Startup)
- Run DDU and select “Clean and restart”
- Once Windows restarts, install the latest GPU drivers from the official website
- Select “Custom Installation” and check “Perform Clean Installation”
Hardware Upgrades That Actually Help Performance
While software tweaks can go a long way, sometimes hardware limitations are the true bottleneck. If you’re considering upgrades to improve Valorant performance, here’s where to focus your budget for maximum impact.
| Component | Impact Level | Budget Recommendation | Performance Improvement |
|---|---|---|---|
| CPU | Very High | Intel i5-12400F or Ryzen 5 5600X | Valorant is heavily CPU-bound – a newer generation CPU can provide 30–50% more FPS even with the same GPU |
| RAM | High | 16GB DDR4-3200MHz dual channel | Upgrading from 8GB to 16GB eliminates stutters; faster RAM speeds boost CPU performance by 10–15% |
| SSD | Medium | Any NVMe SSD (500GB+) | Dramatically reduces load times and texture streaming stutters during gameplay |
| Monitor | Very High | 144Hz+ with low input lag | Higher refresh rates significantly reduce visual lag and improve target tracking |
| GPU | Medium | GTX 1660 Super or RTX 3050 | For Valorant specifically, mid-range GPUs are sufficient for 144+ FPS at 1080p |
| Network Card | Low–Medium | PCIe Gigabit Ethernet adapter | Can improve connection stability vs. built-in motherboard ethernet in some cases |
| Mouse | Medium | Lightweight gaming mouse with 1000Hz+ polling | Reduces physical input lag; wireless models from major brands now have equal/better latency than wired (view lowest latency mice) |
| Cooling | Medium | Better CPU cooler/case fans | Prevents thermal throttling during extended sessions, maintaining peak performance |
Specific Fixes for Common Valorant Lag Scenarios
Beyond general optimizations, certain specific scenarios cause lag problems in Valorant. Here are targeted solutions for common issues players face.
Many players experience sudden FPS drops exactly when they encounter enemies – precisely when performance matters most.
- Disable “Show Blood” in General settings
- Set all “Material Quality” and “Effects Detail” to Low
- Turn off “Improve Clarity” – this post-processing effect hits performance
- Update your shader cache in NVIDIA or AMD control panels
When multiple abilities are used simultaneously (like ultimates in a retake situation), many players experience severe frame drops.
- Disable all visual effects – Bloom, Distortion, and especially Experimental Sharpening
- Lower “Detail Quality” to minimum – this controls particle effects
- Ensure Multithreaded Rendering is ON
- Clear shader cache before playing sessions
- Reduce CPU-intensive background tasks when playing
- Update to latest GPU drivers that may have optimizations for ability effects
Many players notice that their first round or first gunfight always has stutters, even if the game runs smoothly afterward.
- Warmup in the practice range for 2-3 minutes before queuing
- Install Valorant on an SSD for faster asset loading
- Disable “Game DVR” background recording
- Set shader cache size to “10GB” in NVIDIA/AMD settings
Performance often degrades after alt-tabbing or during extended play sessions due to memory issues.
- Use Fullscreen mode instead of Borderless Windowed
- Add more RAM if you have 8GB or less
- Restart the game every few hours to clear memory leaks
Pro Tip: The Perfect Pre-Game Ritual
Many pros follow a specific routine before playing to ensure optimal performance:
- Restart PC completely before starting a session
- Close all background apps except essential ones
- Spend 10-20 minutes in the practice range shooting bots to warm up
- Play one unrated match before jumping into competitive
This ritual could help eliminate first-game stutters and ensures your system, and you, are in the best state for competitive play.
How to Keep Valorant Lag-Free?
After implementing these fixes, you should see significant improvements in your Valorant performance. But maintaining a lag-free experience requires ongoing attention. Here’s how to ensure consistent performance over time.
Develop a regular maintenance schedule to prevent performance degradation:
- Weekly maintenance:
- Clear temporary files and browser cache
- Update game files via the Riot client
- Check for Windows updates
- Restart your router/modem
- Monthly maintenance:
- Update GPU drivers
- Clean dust from PC intake/exhaust vents
- Run disk cleanup and check for fragmentation on HDDs
- Check Windows startup programs for new additions
- Quarterly maintenance:
- Update BIOS/firmware on motherboard and router
- Check CPU/GPU temperatures under load
- Thorough cleaning of PC internals
- Verify that Valorant files are intact (repair function)
Valorant updates frequently, and each patch can affect performance differently:
- Read patch notes for mentions of performance improvements or known issues
- Check Reddit and forums after major updates to see what other players experience
- Be prepared to adjust settings after significant updates
- Wait a day or two before playing ranked after major patches in case of server instability
- Follow official Valorant channels for announcements about server maintenance
Keeping records helps identify when and why performance changes:
- Use benchmarking tools like CapFrameX or FPS Monitor to log performance data
- Keep notes on when lag occurs and under what circumstances
- Document your settings after each successful optimization
- Take screenshots of stable configurations to revert to if issues arise
- Compare performance before and after major Windows or driver updates
Pro Tip: Seasonal System Refresh
Many professional players perform a complete system refresh at the beginning of each new Valorant Episode or Act. This practice ensures optimal performance for competitive play:
- Back up important files and settings
- Perform a clean Windows installation
- Install only essential applications
- Update all drivers to latest stable versions
- Fresh install of Valorant
- Reconfigure settings based on latest optimizations
This might seem extreme, but it eliminates accumulated software issues and ensures your system is operating at peak efficiency for competitive play.
Lag doesn’t magically vanish; it dies a slow death by a dozen smart fixes. If Valorant’s felt like a stuttering mess, chances are it’s not just one thing. Maybe it’s your network routing. Maybe it’s your GPU choking mid-fight.
Whatever the case, this is about narrowing down, dialing in, and taking control of your setup.
Tweak, test, repeat. That’s how you turn lag into responsiveness. Once the stutters are gone and your input delay’s crushed, all that’s left is you and the shot.
FAQs
Why does Valorant lag even with good internet and a decent PC?
Valorant can lag due to unoptimized game settings, outdated drivers, background resource drains, thermal throttling, network routing issues, or Windows misconfigurations. Even with good internet, factors like packet loss or unstable routing can cause issues. Update drivers, close background apps, check temps, and optimize settings.
What’s causing my FPS to drop only during gunfights?
Gunfight FPS drops are often due to effects like particles, lighting, shaders, and CPU spikes from processing multiple events. Lower Detail and Material Quality, disable Improve Clarity, enable Multithreaded Rendering, and close background apps to stabilize performance.
How can I reduce ping in Valorant?
Use wired ethernet, close background apps, select the nearest server, update router firmware, prioritize gaming traffic via QoS/SQM, and avoid peak hours. Remember, physical distance sets a minimum possible ping.
Does capping FPS reduce lag in Valorant?
Capping FPS helps with frame time consistency, reducing stutter on mid-range systems. Set the cap slightly below your stable FPS to smooth performance. Note: it won’t fix network lag, but may decrease input lag, especially when pairing G-Sync + VSync + Reflex / AMD Anti-Lag “On”.
How do I fix packet loss in Valorant?
Use ethernet, replace damaged cables, reboot modem/router, update firmware, limit network congestion, configure QoS/SQM, and contact your ISP with evidence if issues persist. A gaming VPN may help reroute packets.
Should I enable NVIDIA Reflex or AMD Anti-Lag in Valorant?
Yes, NVIDIA Reflex or AMD Anti-Lag “On” reduce system latency and improve responsiveness. It can lower input lag by up to 50%, depending on your system, which is crucial for competitive play.
Why do I lag at the start of each Valorant match?
Match start lag stems from asset and shader loading, especially on HDDs. Install Valorant on an SSD, use a standby list cleaner to clear the standby memory before launching the game, warm up in the range, set GPU shader cache to 10GB, and close demanding background apps.
What are the best Valorant network settings?
Set Network Buffering to Minimum or Normal, enable Raw Input Buffer for high polling range mice (4K/8K), disable or limit FPS slightly below your refresh rate, use Direct Ping Test, and play on your nearest server. Also, prioritize gaming traffic with QoS/SQM and use a wired connection.