Your gaming PC has hidden performance locked away in the BIOS. That RTX 4070 and Ryzen 7 7700X combo struggling to hit 144 FPS? There’s a good chance your system is running with one hand tied behind its back because of conservative default settings.
A few clicks in the BIOS can unlock 5-15% more gaming performance for free. No new hardware needed.
Your BIOS Performance Potential
Unlock these gains with proper configuration
What is BIOS and Why Should Gamers Care?
Your BIOS (Basic Input/Output System) or its modern version UEFI (Unified Extensible Firmware Interface) is the low-level software that controls your hardware before Windows even loads. Think of it as your PC’s most fundamental settings menu, where conservative default configurations often leave significant performance untapped.
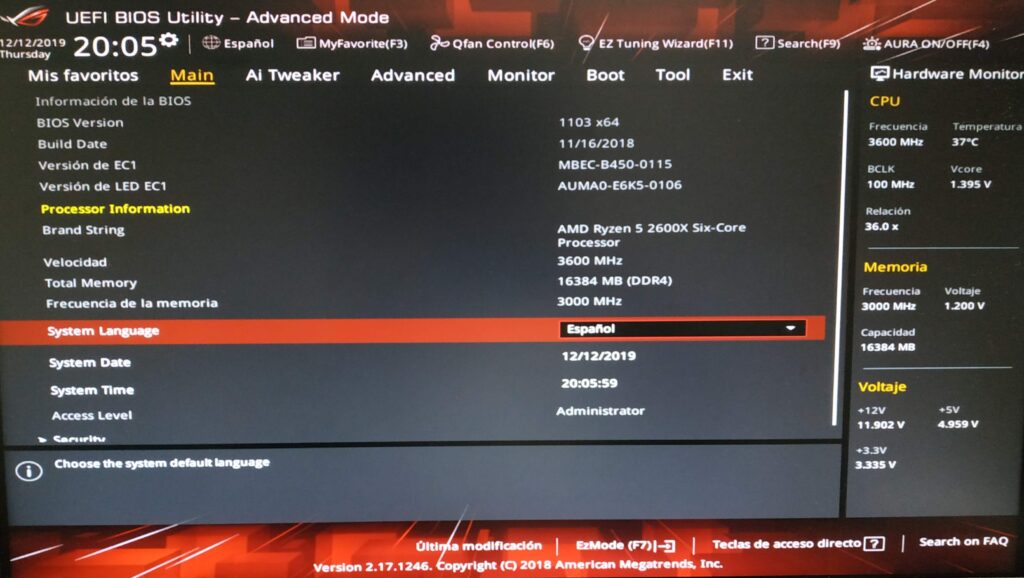
Here’s the reality: motherboard manufacturers ship with safe, compatibility-focused settings that work for everyone but optimize for no one. Your $300 RAM kit? It’s probably running at half speed. That expensive CPU? It’s not boosting as high as it could. The BIOS holds the keys to unlock this wasted potential.
Essential BIOS Settings Checklist
Before You Begin: Critical Safety Steps
BIOS tuning is safe when done correctly, but rushing in blindly can cause instability or boot failures. These preliminary steps ensure you can always recover if something goes wrong.
The #1 BIOS Mistake – Not Enabling XMP/EXPO
This is the most impactful and easiest PC optimization, yet most gamers miss it. When you install RAM, it defaults to conservative JEDEC standards – typically 2133MHz for DDR4 or 4800MHz for DDR5.
Your “3600MHz” RAM? It’s running at 2133MHz until you enable its profile.
| Platform | Setting Name | Location in BIOS | What to Enable |
|---|---|---|---|
|
Intel + DDR4/DDR5
All Intel boards
|
XMP | Ai Tweaker / OC / Extreme Tweaker | Profile 1 (or highest stable) |
|
AMD Ryzen 7000 + DDR5
AM5 boards
|
EXPO | DRAM Settings / Memory | EXPO Profile 1 |
|
AMD Ryzen 5000 + DDR4
AM4 boards
|
DOCP/A-XMP | Ai Tweaker / OC Settings | DOCP (ASUS) or A-XMP (MSI) |
The Hidden GPU Performance Boost
Traditionally, your CPU could only access GPU memory in tiny 256MB chunks. Resizable BAR (AMD calls it Smart Access Memory) removes this limitation, letting the CPU access all GPU memory at once. This reduces latency and can significantly boost performance in modern games.
| Step | Setting | Value | Notes |
|---|---|---|---|
|
Step 1
Required first
|
Above 4G Decoding | Enabled | Usually under PCI Subsystem Settings |
|
Step 2
After Step 1
|
Re-Size BAR Support | Enabled | Same menu as Above 4G |
|
Step 3
Optional
|
CSM Support | Disabled | May be required for some systems |
Platform-Specific BIOS Power: AMD vs Intel Settings
AMD and Intel processors have unique BIOS features that can unlock additional performance. Understanding these platform-specific options lets you extract maximum gaming performance from your chosen CPU.
Fan Curves for Performance
Modern CPUs and GPUs boost higher when they run cooler. The default fan curves prioritize silence over cooling, leaving performance on the table. A more aggressive fan curve can sustain higher boost clocks throughout your gaming session.
| Temperature | CPU Fan Speed | Case Fans | Strategy |
|---|---|---|---|
| Below 40°C | 30% | 25% | Quiet idle operation |
| 40-60°C | 50% | 40% | Ramp up before heat builds |
| 60-75°C | 75% | 60% | Gaming load range |
| Above 75°C | 100% | 80% | Maximum cooling priority |
Additional Performance Settings
Stability Validation
Performance gains mean nothing if your system crashes mid-game. Every BIOS change needs validation to ensure stability. Here’s the professional approach to testing your optimizations.
BIOS Terms Translated
Different motherboard brands use different names for the same settings. This reference helps you find what you’re looking for regardless of your board manufacturer.
| Setting | ASUS | MSI | Gigabyte | ASRock |
|---|---|---|---|---|
| Memory Profile | Ai Overclock Tuner | A-XMP/EXPO | X.M.P./EXPO | Load XMP Setting |
| AMD PBO | AMD Overclocking | PBO | Precision Boost Overdrive | AMD Overclocking |
| Intel MCE | MultiCore Enhancement | Enhanced Turbo | Enhanced Multi-Core Performance | Multi Core Enhancement |
| Resizable BAR | Re-Size BAR Support | Re-Size BAR | Resizable BAR | Re-Size BAR |
| Fan Control | Q-Fan Control | Hardware Monitor | Smart Fan 6 | FAN-Tastic Tuning |
Your Optimized Gaming BIOS
BIOS optimization is the final frontier of PC gaming performance. While in-game settings have the biggest impact on FPS, proper BIOS configuration ensures your hardware operates at its full potential rather than conservative defaults.
Start with the essentials: enable XMP/EXPO for your RAM and Resizable BAR for your GPU. These two changes alone can boost gaming performance by 10-20% with virtually no risk. From there, platform-specific features like AMD’s PBO or Intel’s MCE can squeeze out additional gains if you have adequate cooling.
Frequently Asked Questions
Is it safe to change BIOS settings for gaming?
Yes, the settings in this guide are safe when applied correctly. Enabling XMP/EXPO and Resizable BAR carries minimal risk. More advanced features like PBO or MCE increase power consumption and heat but won’t damage components if temperatures stay under control. Always monitor temps and test stability.
Why is my RAM running at 2133MHz when I bought 3600MHz?
All RAM defaults to conservative JEDEC standards (2133MHz for DDR4, 4800MHz for DDR5) for compatibility. The advertised speed requires enabling XMP (Intel), EXPO (AMD Ryzen 7000), or DOCP/A-XMP (older AMD) in BIOS. This is the most common oversight that costs 5-15% gaming performance.
What’s the difference between PBO and manual overclocking?
PBO (Precision Boost Overdrive) dynamically adjusts clocks based on temperature and power headroom, often achieving higher single-core speeds than manual OC. Manual overclocking sets a fixed frequency for all cores. For gaming, PBO usually performs better due to higher boost clocks on lightly-threaded workloads.
How do I know if my BIOS changes are stable?
Run MemTest86 (4+ passes) after enabling XMP/EXPO to verify RAM stability. Use Prime95 Small FFTs for 30+ minutes to test CPU changes like PBO or MCE. Monitor temperatures during testing. Finally, play demanding games for an hour. Any crashes, errors, or artifacts indicate instability.
Should I disable C-States for gaming?
No, keep C-States enabled. This outdated advice hurts modern CPUs. Current boost algorithms use C-States to free up power budget, allowing active cores to boost higher. Disabling C-States forces all cores to stay active, increasing heat and reducing boost clocks, resulting in worse gaming performance.
What is Resizable BAR and do I need it?
Resizable BAR allows your CPU to access all GPU memory at once instead of 256MB chunks. It requires Intel 10th gen/AMD Ryzen 3000 or newer, plus RTX 30 series/RX 6000 or newer GPUs. Enable “Above 4G Decoding” first, then “Resizable BAR Support.” Games like Forza Horizon 5 see 25%+ gains.
My PC won’t boot after BIOS changes. What do I do?
Clear CMOS to reset BIOS to defaults. Find the Clear CMOS jumper/button on your motherboard (check manual), or remove the coin battery for 5 minutes with power disconnected. This resets all settings. Next time, save a working profile before making changes and adjust one setting at a time.
How much FPS improvement can I expect from BIOS optimization?
Typically 5-15% overall, but it varies by game and hardware. XMP/EXPO alone can boost CPU-limited games by 15%. Resizable BAR adds 0-25% depending on the title. PBO or MCE can add another 5-10%. Combined with better cooling via fan curves, total gains can reach 20% or more in ideal scenarios.
Do I need to update my BIOS?
If your system is stable and has the features you need, updates aren’t mandatory. However, update if you’re missing features like Resizable BAR support, experiencing bugs, or using a recently launched CPU. Never interrupt a BIOS update – use stable power, preferably with a UPS.
What’s the best BIOS setting for maximum FPS?
There’s no single “best” setting, but enabling XMP/EXPO has the highest impact-to-effort ratio. It takes 30 seconds and can boost FPS by 5-15%. After that, Resizable BAR (if supported) and platform-specific features like PBO (AMD) or MCE (Intel) provide additional gains. Always prioritize stability over maximum performance.