Crimson Desert can look incredible and still feel wrong if you chase FPS the lazy way. In this game, several settings barely move performance, one setting does a huge amount of work, and aggressive upscaling can make the image worse faster than you expect.
This guide covers the best Crimson Desert settings for FPS on PC for the current PC build. The goal is simple: keep the world close to Cinematic where it matters, stop paying for invisible waste, and lower the exact settings that buy real frame rate headroom.
The FPS First Setup That Still Looks Like Crimson Desert
Use a custom mix, not a blind preset drop. Lighting Quality does the heavy lifting, Upscale Resolution is the clean fallback, and several expensive-looking cuts barely buy anything at all.
- Custom Instead Of Stock Cinematic
- Lighting Quality Ultra
- Upscale Resolution Quality First
- Ray Tracing On
- Blur Intensity 0
The best starting point is a custom mix built around Ultra and Cinematic values, not a stock preset drop.
Ultra is the sweet spot. Max is too expensive for an FPS-first setup.
Use Quality upscaling before Balanced. It is the safer first move for image quality.
These are usually not where your missing frames are hiding, so do not cut them first.
Why Crimson Desert Settings Feel Different On PC
Most PC games reward the same lazy pattern. Drop the whole preset, turn off the shiny stuff, call it optimized. Crimson Desert does not behave like that. The first meaningful preset cut is from Cinematic to Ultra. After that, random downgrades start giving you much less performance than the visual damage they cause.
The second trap is image quality. The current PC build can get noisier indoors when you slash render resolution too hard, so the most aggressive upscaling modes are not the clean answer they are in some other games. That is why the best Crimson Desert settings for FPS on PC are really about targeted cuts, not blanket cuts.
Approximate gains versus Cinematic on the current build. Exact results vary by GPU, driver, and scene.
These are the few settings that consistently matter. Everything else is secondary or basically free.
Best Crimson Desert Settings For FPS On PC Quick Reference
If you only want the settings first and the reasoning second, start with this exact mix.
Video And Upscaling Quick Reference
Keep output resolution and upscaling as separate decisions.
| Setting | Recommendation | Why |
|---|---|---|
| Resolution | Use Your Monitor’s Native Output Resolution | Keep the output resolution clean, then tune performance through upscaling and the real graphics levers. |
| Upscale Mode | DLSS Or FSR | Use the supported upscale path on your GPU when you need more headroom instead of instantly gutting half the menu. |
| Upscale Resolution | Quality | Quality is the clean first move. Balanced is the next step only if Quality still misses the target. |
| AMD FSR Frame Generation / NVIDIA DLSS Frame Generation | Off By Default | Enable it only after your base render FPS already feels solid. It is not the first fix for a slow baseline. |
| AMD FSR Ray Regeneration / NVIDIA DLSS Ray Reconstruction | Off In An FPS-First Build | These improve noise and lighting, but they are expensive and belong in an image-quality build, not a pure FPS setup. |
| V-Sync | Off | Keep latency and frame pacing cleaner, especially if you later test frame generation. |
Graphics Quick Reference
This is the custom mix that preserves image quality while recovering real FPS.
| Setting | Best Value | Fallback | Why |
|---|---|---|---|
| Preset | Custom | Ultra If You Need A Fast Starting Point | The best Crimson Desert settings for PC are not one stock preset. They are a targeted mix. |
| Model Quality | Ultra | Low Only If You Need A Bigger Cut | Ultra is the best compromise. Low is the real emergency lever. |
| Texture Quality | Cinematic | Lower Only If VRAM Limited | Texture cuts do not usually buy meaningful FPS here. |
| Shadow Quality | Ultra | High If You Want To Match A Lower Preset | Ultra is a small free win compared with Cinematic while keeping shadows sharp. |
| Ray Tracing | On | Test Off Only As A Last Resort | Current testing does not show this as the free FPS win people expect on modern RT-capable GPUs. |
| Lighting Quality | Ultra | Go Lower Only If You Truly Must | This is the biggest meaningful lever in the whole menu. |
| Reflection Quality | Cinematic | Leave It | Usually not worth cutting for the tiny gain. |
| Advanced Weather Effect | On | Leave It | Little measurable performance reason to disable it in the main build. |
| Water Quality | Cinematic | Leave It | Basically free in FPS terms. |
| Foliage Density | Cinematic | Medium | Medium is a clean fallback when you need a little extra room. |
| Volumetric Fog Quality | High | Medium Only If You Need More | High looks very close to Cinematic and gives a small but useful gain. |
| Effect Quality | Cinematic | Leave It | Minimal to no meaningful FPS return from lowering it. |
| Simulation Quality | Cinematic | Leave It | Another setting that usually does not justify the visual cut. |
| Post-processing Effect Quality | Cinematic | Leave It | The FPS gain is tiny at best, so keep the fuller image. |
Accessibility And Image Cleanup
This does not drive FPS, but it does clean up the current build.
| Setting | Recommendation | Why |
|---|---|---|
| Blur Intensity | 0 | It is a clean visibility fix and one of the easiest quality-of-life changes you can make right away. |
Best Crimson Desert Video Settings For FPS On PC
The most important rule in this section is to separate Resolution from Upscale Resolution. Resolution is your output. Upscale Resolution is your render workload. Keep the output resolution set for the display you actually want to use, then recover performance through Upscale Resolution and the real graphics levers before you start butchering the rest of the image.
That is why the clean Crimson Desert PC optimization path is Quality first, Balanced second, and only then larger cuts. Quality already returns a big performance gain versus pure native rendering, while Balanced is there when you need extra headroom.
Resolution
OutputSet Resolution for the display you want to drive. Do not use this as your first performance knob if the goal is to keep the game looking clean.
Upscale Resolution
Render CostSet Upscale Resolution to Quality first. Go to Balanced only if you still miss your target. This is the right order for most PCs.
Frame Generation
ConditionalAMD FSR Frame Generation or NVIDIA DLSS Frame Generation should only come after your base render FPS already feels solid. It is not a substitute for a good baseline.
Ray Regeneration And Ray Reconstruction
Not Free FPSAMD FSR Ray Regeneration and NVIDIA DLSS Ray Reconstruction clean up the image, but they are expensive enough that they do not belong in the main FPS-first recommendation.
Do Not Confuse Output Resolution With Render Resolution
A lot of bad settings advice starts right here. Saying “native 1080p” when you actually mean “1080p output with upscaling active” muddies the whole setup. Keep Resolution and Upscale Resolution separate, and the rest of the guide starts making sense immediately.
Best Crimson Desert Graphics Settings For FPS On PC
Most of the graphics menu is not where your missing frames are going. If you treat every option as equally important, you will spend more time lowering the wrong things than actually improving performance. The settings below are the ones worth caring about first.
Lighting Quality Recommended: Ultra
Highest Impact
Lighting Quality is the real optimization lever in Crimson Desert. Ultra buys back a meaningful chunk of FPS while keeping the image far closer to Cinematic than a brute-force preset drop. Max is not part of an FPS-first setup. It is too expensive, and it is not the right place to look if you want cleaner performance.
Model Quality Recommended: Ultra
Moderate
Model Quality is the next real lever. Ultra is a strong compromise because it keeps world geometry dense while returning a little performance. If you still need a bigger cut after the usual steps, Low is where the real emergency gain lives.
Shadow Quality Recommended: Ultra
Small Win
Shadow Quality is one of the cleaner small wins. Ultra keeps shadows sharp and stable while trimming a little cost from Cinematic. Going much lower starts to show up faster than it helps.
Volumetric Fog Quality Recommended: High
Small Win
Volumetric Fog Quality is another quiet optimization. High stays close to Cinematic visually and gives you a small but legitimate gain. That makes it perfect for a custom build.
Foliage Density Recommended: Cinematic
Fallback Cut
Foliage Density should stay high in the main recommendation because the world looks richer for very little cost. If you still need a few more frames after the normal fixes, drop it to Medium before you start touching the almost-free settings.
Ray Tracing Recommended: On
Do Not Assume Off Is Faster
For the main Crimson Desert PC recommendation, leave Ray Tracing On. Current testing on modern RT-capable GPUs does not show a worthwhile free FPS win from disabling it, and the visual downgrade is obvious. This is one of the rare games where “just turn RT off” is not good blanket advice.
The Settings You Usually Leave High
Once the real levers are handled, the rest of the menu gets much easier. These are the settings you usually leave at or near the top because the FPS return is too small to justify the cut.
Texture Quality
Usually no meaningful FPS win. Lower it only if your VRAM situation forces the issue.
Reflection Quality
The visual drop is easier to notice than the frame rate gain, so leave it near the top.
Water Quality
Current testing treats this as basically free. There is little reason to cut it first.
Effect Quality
Not a meaningful FPS lever in the current build, so do not waste one of your first cuts here.
Simulation Quality
Another setting that does not pay you back enough to justify lowering it.
Post-processing Effect Quality
The gain is tiny at best. Keep the fuller look and spend your cuts elsewhere.
Advanced Weather Effect
It exists, but it is not a major performance pressure point in the main PC build.
Do Not Start By Lowering Texture Quality Or Water Quality
That is the classic bad guide mistake. Those settings sound expensive, but in Crimson Desert they are usually not your real problem.
Best Crimson Desert Blur And Noise Fixes On PC
Crimson Desert’s strangest visual issue is not outdoor sharpness. It is the indoor noise, shimmer, and softness that show up when lighting, denoising, and render resolution collide in the wrong way. If the game looks muddy, treat it like an image-path problem before you treat it like a preset problem.
Use This
Cleaner ImageLighting Quality at Ultra, Ray Tracing On, Upscale Resolution on Quality, and Blur Intensity at 0 is the safest starting point for a cleaner picture.
Avoid This
Common TrapDo not jump straight to the most aggressive upscale mode and do not assume Lighting Quality Max is “best” just because it is the highest value. In the current build, that can make the whole image feel worse for the kind of PC setup this article is targeting.
Ray Reconstruction Or Ray Regeneration
Later, Not FirstIf you have lots of GPU headroom, these can clean up the image dramatically. For an FPS-first guide, though, leave them off until you already hit your target the normal way.
Blur Intensity
AccessibilityBlur Intensity is one of the easiest cleanups in the whole menu. Set it to 0 and take the free visibility gain.
AMD FSR4 In Rainy Scenes Is A Current Trouble Spot
If rainy weather suddenly looks wrong, with missing rain or strange smearing, that is a known issue in the current build rather than proof that your whole setup is bad. Switch away from that path and retest before changing ten other things.
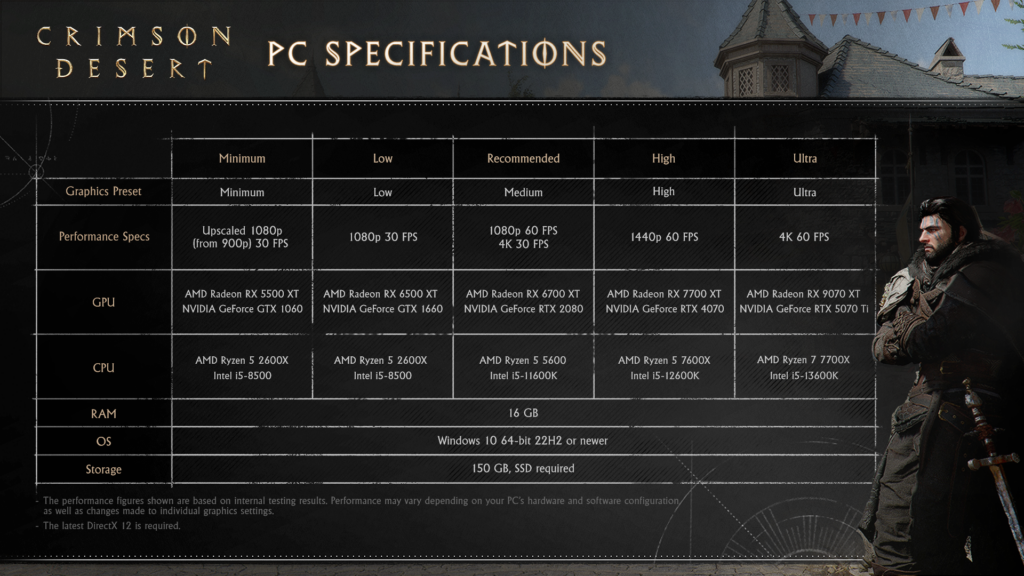
Best Crimson Desert Settings By Target Resolution
Use the main custom mix above first, then pick the closest target below and only make the fallback cuts listed for your resolution.
Closest Official Target
1080p 60 FPS sits closest to the official Recommended tier. With a decent mid-range PC, the custom mix is the right place to start.
Render Path
Keep Resolution at 1920×1080. If you already hold the target, you do not need an upscaler. If you do not, use Upscale Resolution Quality first.
Main Graphics Mix
Use the full custom mix: Lighting Quality Ultra, Model Quality Ultra, Shadow Quality Ultra, Volumetric Fog Quality High, and the rest mostly high.
If You Still Need FPS
Move Upscale Resolution to Balanced, then drop Foliage Density to Medium. Save Model Quality Low for a bigger emergency cut.
Closest Official Target
1440p 60 FPS lines up with the official High tier. This is where the custom mix makes the most sense for modern mid-range and upper-mid-range systems.
Render Path
Keep Resolution at 2560×1440. On many GPUs, Upscale Resolution Quality is the best baseline instead of pure native rendering.
Main Graphics Mix
The same custom recommendation still applies. Crimson Desert tends to reward smart targeted cuts more than broad preset drops.
If You Still Need FPS
Go to Balanced before random menu cuts. Then try Foliage Density Medium. Only after that should you look at the harsher options.
Closest Official Target
4K 60 FPS is the official Ultra target. Outside the fastest GPUs, this is where upscaling becomes part of the normal plan.
Render Path
Keep Resolution at 3840×2160. Use Upscale Resolution Quality as the default starting point, and move to Balanced only if needed.
Main Graphics Mix
Keep the custom mix intact. The point is to preserve the parts of the image that still matter at 4K instead of randomly flattening the game.
If You Still Need FPS
Use Balanced, then test Frame Generation only if your base render FPS is already strong. Leave Ray Regeneration and Ray Reconstruction out of the FPS-first build.
What To Lower First If You Still Need More FPS
If Crimson Desert is still missing your target after the main custom setup, lower settings in this order. This saves time and keeps you from wrecking the image for no reason.
Move Upscale Resolution From Quality To Balanced
This is the cleanest next step. It gives you a real FPS gain without immediately flattening half the world.
Drop Foliage Density To Medium
If you are just a little short, this is one of the least painful cuts you can make after the render path is already sorted.
Use Model Quality Low Only When You Need A Bigger Cut
Model Quality is the real emergency lever after the gentle cuts are gone. It is more noticeable, but it finally buys a bigger return.
Touch Lighting Quality Below Ultra Only As A Last Resort
Lighting Quality Ultra already gave you the big win. Going lower costs a lot visually and should not be your next move unless you are clearly desperate for frames.
Use Frame Generation After The Baseline Feels Good
If the base render is already comfortable, Frame Generation can be the bonus layer. If the base render still feels rough, this is the wrong fix.
What Not To Lower First
Do not start with Texture Quality, Water Quality, Effect Quality, or Simulation Quality. And do not assume turning Ray Tracing off will magically rescue the frame rate.
PC Tweaks That Matter Around The Menu
Before you blame the settings menu for everything, make sure you are not fighting an external problem. Overlay conflicts, background updates, and storage hiccups can create the kind of micro stutter on PC that feels like a bad preset even when the real culprit is the rest of the system.
It also helps to stop chasing meaningless peaks. A stable target based on what actually counts as good FPS for gaming will usually feel better than a higher number you only see in lighter scenes.
If Crimson Desert still hitches after the in-game pass, the next step is not another random Low preset. It is cleaning up the PC around the game, from driver state and startup load to background apps and memory pressure. A simple pass focused on optimizing your PC for gaming can be the difference between a stable session and a messy one.
Troubleshooting Crimson Desert PC Settings
The Game Looks Blurry
Set Blur Intensity to 0, keep Upscale Resolution at Quality or better, and avoid the most aggressive upscale modes unless you truly need them. If you are testing Lighting Quality at Max, go back to Ultra.
Frame Generation Feels Worse Than Expected
Turn Frame Generation off first and make the base render stronger. Also keep V-Sync off. A bad baseline with a bigger on-screen FPS number is still a bad baseline.
Rain Or Distortion Looks Broken On AMD
If you are using FSR4 and rainy scenes suddenly lose rain or smear the image, that is a known issue in the current build. Test another upscale path instead of rebuilding your whole setup around a bug.
My Settings Are Not Sticking
If settings stop behaving after a reset, that is currently a known issue. Reapply the exact values manually and test again instead of assuming the menu is honoring the previous restore.
The Game Will Not Launch On Intel Arc
This is not a graphics settings problem. The current PC build does not support Intel Arc, so no menu tweak is going to fix that path right now.
I Need Survival Mode Settings
If your hardware is truly outdated, stop pretending small tweaks will save it. Move through Balanced, then Model Quality Low, then finally the Low or Minimum preset if you absolutely have to.
Conclusion
The best Crimson Desert settings for FPS on PC are built around a custom mix, not a blind preset drop. Keep Resolution and Upscale Resolution separate, start with Quality upscaling when needed, leave Ray Tracing on for the main build, and center the whole setup around Lighting Quality Ultra.
Once that foundation is in place, the rest becomes easy. Cut Foliage Density only when you need a little more, save Model Quality Low for bigger emergencies, and stop wasting time on settings that barely move the needle.
FAQ
What are the best Crimson Desert settings for FPS on PC
For most players, the best Crimson Desert settings for PC are a custom mix built around Resolution at your display target, Upscale Resolution on Quality when needed, V-Sync Off, Model Quality Ultra, Texture Quality Cinematic, Shadow Quality Ultra, Ray Tracing On, Lighting Quality Ultra, Reflection Quality Cinematic, Water Quality Cinematic, Foliage Density Cinematic, Volumetric Fog Quality High, and Blur Intensity 0.
Should I turn Ray Tracing off in Crimson Desert
Usually no. Current testing on modern RT-capable GPUs does not show Ray Tracing as the free FPS win many players expect. For the main FPS-first recommendation, leave Ray Tracing on and lower the settings that actually buy performance first.
What is the best Lighting Quality setting in Crimson Desert
Ultra is the best Lighting Quality setting for an FPS-first setup. It is the main performance lever in Crimson Desert, returns a meaningful FPS gain versus Cinematic, and avoids the heavy cost of Max.
Should I use Quality or Balanced upscaling in Crimson Desert
Start with Quality. It is the cleaner first step for most PCs. Move to Balanced only if Quality still does not hold your target frame rate.
Is Frame Generation worth using in Crimson Desert
It can be, but only after your base render FPS is already strong. Frame Generation is a bonus layer, not the first fix for a weak baseline.
What should I lower first for more FPS in Crimson Desert
Lower Upscale Resolution from Quality to Balanced first. After that, drop Foliage Density to Medium. If you need a bigger emergency cut, use Model Quality Low before you start flattening the rest of the image.
Why does Crimson Desert still look blurry or noisy indoors
The current PC build can get noisy indoors when lighting and render resolution are pushed the wrong way. Keep Lighting Quality at Ultra, keep Ray Tracing on, avoid the most aggressive upscale modes first, and set Blur Intensity to 0.
Does Crimson Desert support Intel Arc on PC
No. The current PC build does not support Intel Arc, so this is a compatibility issue rather than a settings issue.